Creating and Managing Sections
When you create a self-paced learning opportunity, one section will be created for you (and you cannot create more).
For instructor-led courses, you must create one or more sections, and you can create as many as you need, each time
the course is offered. Note that for instructor-led courses, it is the section that appears in the catalog when it is
released for registration, and not the course itself.

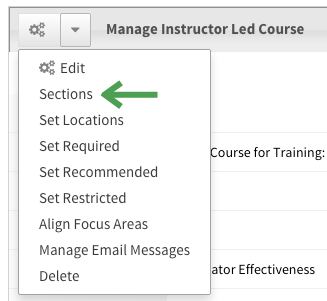
Clicking Sections in the tools menu at the top of the Manage Resource page will take you to the bottom of that
page, where sections are listed. (Or, of course, you can simply scroll down to view them.)

In the sections area of the page, click New Section to add a section.
Creating a new section
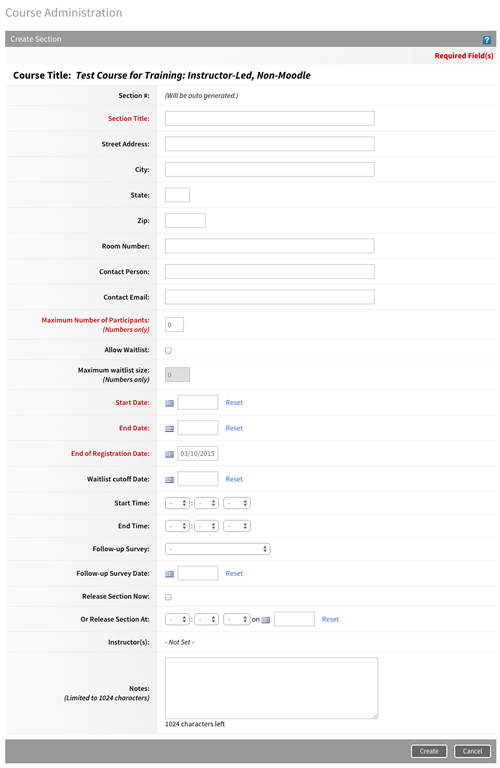
The form for creating a section contains a number of fields, which are explained below. Note that this form is the same
for Moodle and non-Moodle courses. However, when you create a section for a Moodle course, a section will automatically be created for you in Moodle as well.

- Section Title (Required)
- You must provide a title for the section. It is strongly recommended that you have a consistent naming convention
for sections, to avoid confusion.
- Location
- Enter the address and room number of the section, if applicable.
- Contact Person and Email
- If applicable, provide the name and email of the person to be contacted with questions about the section.
- Maximum Number of Participants (Required)
- The maximum number of participants for the section. Registration will be cut off when maximum enrollment is reached,
unless you allow for a waitlist.
- Waitlists
- Check the box to allow a waitlist if you wish, and then enter a maximum size for the waitlist. Registration will be
cut off when the waitlist is full.
- Start and End Date (Required)
- Enter a start and end date for the section. (They can be the same for a one-day workshop.)
- End Registration Date (Required)
- Date on which enrollment will be cut off.
- Waitlist cutoff date
- If you allowed for a waitlist, enter a date on which it will be cut off.
- Start and End Time
- The start time (on the start date) and end time (on the end date) for the section.
- Follow-Up Survey
- If desired, select one of the available surveys for participants to complete after the course ends,
and enter a date by which the survey is to be completed.
- Release Section
- Check the box to release the section for registration immediately, or enter a date and time when it will be released.
Only when it is released will it appear in the catalog.
- Notes
- Any additional information about the section.
When you are finished, click Create.
Additional actions

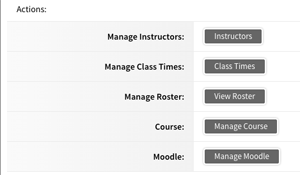
Each section has additional actions that need to be completed. They will now appear at the bottom of the page.
Most of these actions will be discussed later in this mini-module.
- Manage Instructors
- Add or remove instructors for this section. If it is a Moodle course, instructors you add here will become instructors in the Moodle section.
(See [LINK].)
- Manage Class Times
- Click Class Times to set class times for this section. Setting class times enables you to manage attendance in the roster
(see [LINK]).
- Manage Roster
- Click View Roster to access the roster for this section. (See [LINK].)
- Manage Course
- This button returns you to the main record for your course.
- Manage Moodle (Moodle courses only
- If this is a section of a Moodle course, this button gives you access to advanced options for managing Moodle. (See [LINK].)


